Monday, January 9, 2012

Baby Shower Banner

I'm helping to host a baby shower this weekend and wanted to make a banner with the baby's name on it. I started by cutting out 8x9 inch triangles and added one inch at the top to later fold over for the string to go through.


I googled cute fonts and when I found one i liked, I opened it in photoshop, cut each letter out and opened in a new file. Resized each letter to 3 inches then printed it out. I cut the letter out of the paper.


Next, I ironed heat n bond to the back of the fabric, then placed my letters backwards on the heat n bond. After I cut them out, it was time to iron onto my triangles.


I found the letters didn't show up so using the same process as above, I cut out white circles to make my letter stand out. The letters were ironed onto the circles which were then ironed onto the triangle using heat n bond.


Fold edges over 1/4 inch and top stitch using an edgestitch foot. Ten fold the top 1/4 inch twice and top stitch across creating a casing.


Run a string through and you're done!


- Posted using BlogPress from my iPhone

Tuesday, January 3, 2012

Poor Man's Inchbug Cup Label

What you'll need:

Wide rubber band
Sharpie


Write child's name on the rubber band


Voila!


Posted using BlogPress from my iPhone

Sunday, January 1, 2012

Lunch Bag

I am really excited about this post. I was inspired by a bag tutorial on the Purlbee blog, but I changed a bunch of things. First, I wanted to make sure it would keep lunches cool. Plus, it had to be washer and dryer safe. I researched what to use and found Insulbright. It will rock your socks off.

What you'll need:
1/2 yard of outer fabric, Insulbright and interior fabric
velcro

Cut 2- 13 1/2 x 10 inch out of each fabric
Layer your pieces with the outer fabric facing down, Insulbright with the shiny side facing up, then your interior fabric and pin together
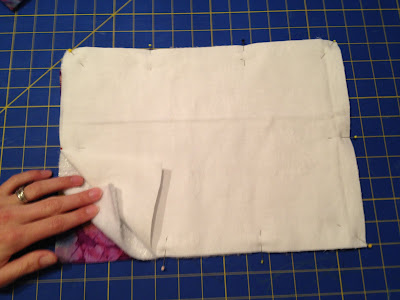
Using 1/2 inch seam allowance, sew all the way around through all three fabrics. I used my serger. If you use a serger, use a sewing machine to sew across the top, backstitching at each end.
Carefully cut the Insulbright out of the seam allowance at the top making sure not to cut the other two fabrics. This will make it less bulky to fold over.
Fold the top over 1/4 inch, pin and sew. Don't worry about the raw edge because your velcro will cover it.
To make the pull tab, cut two 2 x 4 inch strips from your outer fabric
Fold the long edges over 1/4 inch and press

Fold the strip in half and use your edge foot to sew along each side.
Sew velcro across the top of each piece with the tab between the velcro and fabric. I arranged my tabs to rest next to each other instead of uniform.
Place your pieces outer sides together and sew/surge down one side, across the bottom and up the other side.
Fold the bottom flat so the corners come to a point. Draw a line where a ruler measures 3 inches across.

Sew or surge across the marked line. If you sew, then cut off the excess fabric. If you don't have a serger, use a zigzag stitch on your raw edges for a nicer finish.
Turn the bag right side out and you have an insulated lunch bag!

Window/Card Tree

We have always put our Christmas tree in our front window. I love pulling up to the house and seeing the tree lit at night. This year we wanted out tree in the den where we spend most of our time so I searched pinterest for an idea to bring some light to my front room. I found this and loved it:
I knew I wanted to add lights to mine and I love the big bulb lights. I had planned to add ornaments, but never found any I loved that I could afford a bunch of. My Christmas cards were crowding the mantle, so I hung them from the branches and liked how it looked.
So here is my front room tree. It's perfect for me. I can see it from the street and I like the way it looks in the room. Now if only the rest of the room could look as cool as my branch tree.....
- Posted using BlogPress from my iPhone